Thursday, May 7, 2009

Debugging AppEngine application on NetBeans

Earlier I explained how to open and compile a Java AppEngine application on NetBeans. Now let's see what it takes to debug it.
If you are familiar with remote debug mode of NetBeans, it's actually very easy to connect to a running AppEngine dev_appserver. But first we should open a port to connect to. This is how it's done on Windows.
Edit AppEngine Java SDK dev_appserver script. It's located in appengine-java-sdk-1.2.0/bin folder. There are two versions of this script: for Windows (dev_appserver.cmd) and for Unix/Linux/OSX (dev_appserver.sh). There is also appcfg script, which we will not change. Open the script corresponding to your operating system (File|Open File... in NetBeans). The Windows command script looks like this:
@java -cp "%~dp0\..\lib\appengine-tools-api.jar" ^
    com.google.appengine.tools.KickStart ^
       com.google.appengine.tools.development.DevAppServerMain %*
You need to edit this file to look like this:
@java -cp "%~dp0\..\lib\appengine-tools-api.jar" ^
    com.google.appengine.tools.KickStart ^
       --jvm_flag=-Xdebug ^
       --jvm_flag=-Xrunjdwp:transport=dt_socket,address=8000,server=y,suspend=n ^
       com.google.appengine.tools.development.DevAppServerMain %*
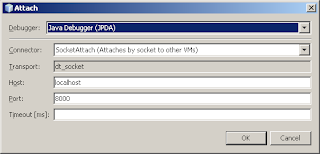
This will open port 8000 so a remote debugger can attach. Now open a command prompt and change current directory to appengine-java-sdk-1.2.0. Then run dev_appserver with your application, for example by typing bin\dev_appserver.cmd demos\guestbook\war. This will run the dev_appserver as usual, but this time the debug port is open. It should print on the very first line something like: Listening for transport dt_socket at address: 8000. Now attach to this port from NetBeans. In Debug menu select Attach Debugger.... This will open the following dialog box:

Fill the values like on the screen shot, and press OK. If the debugger attaches correctly, the stop and pause buttons in the toolbar and the corresponding menu items in Debug menu should become enabled.
Let's set a break point now. Press Ctrl-O and type "Greeting" to open a persistent class and set break point in getAuthor method. Now go to http://localhost:8080/guestbook.jsp in your browser and NetBeans should stop on this break point for every record in the guest book. Enjoy!

Friday, April 17, 2009

AppEngine project on NetBeans

This is a beginning of discussion, continued here

Recently Google released an early look of AppEngine for Java. It includes an Eclipse plugin for developing with AppEngine Java SDK. I wanted to check is it possible to develop AppEngine Java application using NetBeans

Environment

  1. Sun JDK 1.6.0_12
  2. NetBeans 6.7 M2 (pre-release)
  3. gae-java-sdk-1.2.0

Opening project

Let's start with basic AppEngine demo Guestbook. It's located in demos/guestbook directory of gae-sdk-java.

Create project wizard

Start the wizard with File|New Project.

Step 1

Select options like this:

Step 2

Enter the location of the project in the edit box, or click browse:

The rest of the lines will be filled automatically.

Step 3

Leave the default options on the "Build and Run Actions" page.

Step 4

Don't change anything on the "Web Sources" page.

Step 5

Click "Next" on "Source Package Folders" page.

Step 6

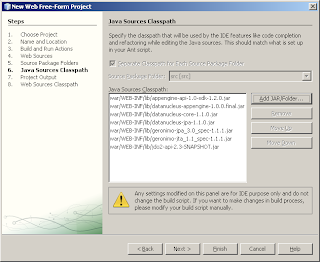
Click "Add JAR/Folder" on the "Java Sources Classpath" page and add all jars located in war/WEB-INF/lib folder under guestbook root:

Click Finish to leave default settings on the last two pages.

Fixing classpath

The resulting project will look like this:

Two Servlet files have errors because NetBeans has limited abilities on parsing ant build files. It could not extract the compile time dependencies from build.xml, so we pointed to WEB-INF/lib libraries at Step 6. But one of the compile dependencies (Servlet API jar) is located outside of the project tree. It's because this jar is supplied by the application server. In my pre-release version of NetBeans the UI is not able to use dependencies outside of the project tree, but it's easy to work around.

Edit project.xml

Press Ctrl-F2 or select Window|Files to switch to files panel. You see all files under your project root:

Click on + sign to open nbproject, right-click on project.xml and select Edit. This opens internal NetBeans project file which contains all the settings we selected in the wizard. Find line which contains <classpath> element near the end of the file. Go to the end of the line and add the path Servlet API jar. This jar is located in lib/shared folder under the Google AppEngine Java SDK folder, in my case the full path was C:\work\appengine-java-sdk-1.2.0\lib\shared\geronimo-servlet_2.5_spec-1.2.jar

Press Ctrl-S to save the project.xml file and return to Projects pane (press Ctrl-1). Now NetBeans is happy and no errors are reported.

Running the application

You can run this application as you run any project in NetBeans. If this is the main project, simply press F6. When the project is running, you will see the following line in the Output window: The server is running at http://localhost:8080/. You can enter this URL in a browser and start using the Guestbook application. In this post you can find out how to debug AppEngine java web application using NetBeans.

Saturday, April 11, 2009

DelayQueue via interceptor

In the previous post I published a simple solution for using java.util.concurrent.DelayQueue with Spring Integration queue channel. Then Iwein Fuld suggested a nice improvement of namespace configuration. I liked the idea, but if the underlying queue is DelayQueue how to ensure all elements implement Delayed interface if I don't override doSend method and use the standard QueueChannel? That can be done with a ChannelInterceptor. I really like the way the guys from Spring Integration designed the API, there is an extension point just where you need it.

So if Iwein's proposition will be implemented, the configuration of the delay queue will look like this:


This also solves the problem with different delays for messages in the same queue. I made an example with HeaderDelayInterceptor, which looks at message header to set the time out.

It can be configured similar to SimpleDelayInterceptor:
While we are waiting for the queue-class feature to be implemented, we can create channel instances as usual Spring beans:


The important thing to remember is to put this interceptor the last, if you need other interceptors. This is important, because other interceptors might create Message instances not implementing Delayed, and the DelayQueue will throw ClassCastException. While I'm looking for a better place to host source code, it will be listed here:
/**
 * Wraps messages sent to the channel to implement Delayed interface. Required
 * for queue channel created with DelayQueue instance. Causes messages to wait
 * in the queue for the specified delay.
 * @author Andrew Skiba skibaa@gmail.com
 * Use for any purpose at your own risk.
 */
public class SimpleDelayInterceptor extends ChannelInterceptorAdapter {

    private long delay;
    private TimeUnit timeUnit;

    public SimpleDelayInterceptor(long delay, TimeUnit timeUnit) {
        this.delay = delay;
        this.timeUnit = timeUnit;
    }

    @Override
    public Message preSend(Message message, MessageChannel channel) {
        final long sendingTime = System.currentTimeMillis();
        return new DelayedMessageAdapter(message) {
            public long getDelay(TimeUnit unit) {
                long millisPassed = System.currentTimeMillis() - sendingTime;
                long unitsPassed = unit.convert(millisPassed, TimeUnit.MILLISECONDS);
                long delayInGivenUnits = unit.convert(delay, timeUnit);
                return delayInGivenUnits - unitsPassed;
            }
        };
    }
}

/**
 * QueueChannel requires its elements to implement Message, and
 * DelayQueue requires its elements to implement Delayed. This
 * class implements both to satisfy these requirements. For Mesage
 * interface it acts as a proxy and forwards all calls to the wrapped Message.
 * @author Andrew Skiba skibaa@gmail.com
 * Use for any purpose at your own risk.
 */
public abstract class DelayedMessageAdapter implements Delayed, Message {
    private Message wrappedMessage;

    public DelayedMessageAdapter(Message wrappedMessage) {
        this.wrappedMessage = wrappedMessage;
    }

    protected Message getMessage() {
        return wrappedMessage;
    }

    public abstract long getDelay(TimeUnit unit);

    public int compareTo(Delayed o) {
        return new Long(getDelay(TimeUnit.NANOSECONDS))
                .compareTo(o.getDelay(TimeUnit.NANOSECONDS));
    }

    public MessageHeaders getHeaders() {
        return wrappedMessage.getHeaders();
    }

    public T getPayload() {
        return wrappedMessage.getPayload();
    }

    @Override
    public String toString() {
        return wrappedMessage.toString();
    }
}

/**
 * Wraps messages sent to the channel to implement Delayed interface. Required
 * for queue channel created with DelayQueue instance. Causes messages to wait
 * in the queue till System.currentTimeInMillis() reaches the value specified
 * in message header. The header name is customizable.
 * @author Andrew Skiba skibaa@gmail.com
 * Use for any purpose at your own risk.
 */
public class HeaderDelayInterceptor extends ChannelInterceptorAdapter {
    String headerName;

    public HeaderDelayInterceptor(String headerName) {
        this.headerName = headerName;
    }

    @Override
    public Message preSend(Message message, MessageChannel channel) {
        //fail early if header is missing or incorrect
        Object waitTill=message.getHeaders().get(headerName);
        if (waitTill==null)
            throw new IllegalArgumentException("HeaderDelayInterceptor expects " +
                "header with name:" + headerName +
                " which was not found in message:" + message);
        if (!(waitTill instanceof Long))
            throw new IllegalArgumentException("HeaderDelayInterceptor expects " +
                "Long value in header with name:" + headerName +
                " incompatible type found in message:" + message);
        //everything looks OK, create a wrapped message
        return new DelayedMessageAdapter(message){
            public long getDelay(TimeUnit unit) {
                Long waitTill=(Long)getMessage().getHeaders().get(headerName);
                long delayRemained=waitTill-System.currentTimeMillis();
                return unit.convert(delayRemained, TimeUnit.MILLISECONDS);
            }
        };
    }
}
And the unit test is here:
/**
 * @author Andrew Skiba skibaa@gmail.com
 * Use for any purpose at your own risk.
 */
public class DelayQueueChannelTests {
    static Logger logger = Logger.getLogger(DelayQueueChannelTests.class.getName());

    @Test
    public void testSimpleDelay() throws Exception {
        final AtomicBoolean messageReceived = new AtomicBoolean(false);
        final CountDownLatch latch = new CountDownLatch(1);
        final QueueChannel channel = new QueueChannel(new DelayQueue());
        channel.addInterceptor(new SimpleDelayInterceptor(100, TimeUnit.MILLISECONDS));
        new Thread(new Runnable() {

            public void run() {
                Message message = (Message)channel.receive();
                assertTrue(message instanceof DelayedMessageAdapter);
                messageReceived.set(true);
                latch.countDown();
                float waitTime=(System.currentTimeMillis()-message.getPayload())/1000.F;
                logger.info("waited for "+waitTime+" seconds ");
            }
        }).start();
        assertFalse(messageReceived.get());
        channel.send(new GenericMessage(System.currentTimeMillis()));
        assertFalse(messageReceived.get());
        latch.await(25, TimeUnit.MILLISECONDS);
        assertFalse(messageReceived.get());
        latch.await(1, TimeUnit.SECONDS);
        assertTrue(messageReceived.get());
    }

    private final static String HEADER_NAME="test.waitTill";

    @Test
    public void testMessageDelay() throws Exception {
        final AtomicBoolean [] messagesReceived = new AtomicBoolean[] {
            new AtomicBoolean(false), new AtomicBoolean(false)
        };
        final CountDownLatch latch1 = new CountDownLatch(1);
        final CountDownLatch latch2 = new CountDownLatch(1);
        final QueueChannel channel = new QueueChannel(new DelayQueue());
        channel.addInterceptor(new HeaderDelayInterceptor(HEADER_NAME));
        new Thread(new Runnable() {

            public void run() {
                Message message = (Message)channel.receive();
                assertTrue(message instanceof DelayedMessageAdapter);
                messagesReceived[message.getPayload()].set(true);
                latch1.countDown();
                message = (Message)channel.receive();
                assertTrue(message instanceof DelayedMessageAdapter);
                messagesReceived[message.getPayload()].set(true);
                latch2.countDown();
            }
        }).start();
        assertFalse(messagesReceived[0].get());
        assertFalse(messagesReceived[1].get());
        long now=System.currentTimeMillis();
        channel.send(MessageBuilder.withPayload(0).setHeader(HEADER_NAME, now+200).build());
        channel.send(MessageBuilder.withPayload(1).setHeader(HEADER_NAME, now+100).build());
        assertFalse(messagesReceived[0].get());
        assertFalse(messagesReceived[1].get());
        latch1.await(25, TimeUnit.MILLISECONDS);   //not enough time for either message
        assertFalse(messagesReceived[0].get());
        assertFalse(messagesReceived[1].get());
        latch1.await(170, TimeUnit.MILLISECONDS);         //the second message should be ready before the first
        assertFalse(messagesReceived[0].get());
        assertTrue(messagesReceived[1].get());
        latch2.await(200, TimeUnit.MILLISECONDS);
        assertTrue(messagesReceived[0].get());
    }
}
DelayQueueChannel for Spring Integration

This is a beginning of discussion, continued here.

Spring Integration is an amazing project. It allows with a few lines of code or with a small Spring XML configuration to establish a powerful Enterprise Application Integration server. We are used to think about EAI as a heavy weight solution, but with Spring Integration it's a modest library deployed together with your console or web application. I'm really excited about its ease of use.

The central component in this framework is a message channel. It has a few implementations, most basic of which are direct channel and queue channel. Direct channel allows processing in the same thread, and queue channel holds messages until a processor will take them for processing.

When a message processing fails, it's usually desirable to wait before retrying. In EAI your application often depends on remote servers, which may be temporarily unavailable. If you try the failing operation in a few minutes, it has better chances to succeed.

Out of the box, Spring Integration does not provide a facility to delay messages for such a long period. While it's easy to insert a sleeping in the middle of processing, sleeping for long periods will waste precious thread resources of the server. So I extended Spring Integration queue channel to support delays.

Fortunately, Java has a standard DelayQueue, a part of java concurrency API, one of the best in Java. Used correctly, it performs very fast and is relatively error-proof.

The basic Spring Integration queue channel was created with extensibility in mind. It has a constructor accepting a java.util.concurrent.BlockingQueue instance, and DelayQueue is just an implementation of BlockingQueue. So what's left is to glue this great components together to do the job.

/**
 * @author Andrew Skiba skibaa@gmail.com
 * Use for any purpose at your own risk.
 */
public class SimpleDelayQueueChannel extends QueueChannel {
    private long delay;
    private TimeUnit timeUnit;

    /**
     * QueueChannel requires its elements to implement Message, and
     * DelayQueue requires its elements to implement Delayed. This
     * class implements both to satisfy these requirements. For Mesage
     * interface it acts as a proxy and forwards all calls to the wrapped Message.
     */
    protected class DelayedMessage implements Delayed, Message {
        long createdClock;
        Message wrappedMessage;

        public DelayedMessage(Message wrappedMessage) {
            this.wrappedMessage = wrappedMessage;
            createdClock = System.currentTimeMillis();
        }

        public long getDelay(TimeUnit unit) {
            long millisPassed=System.currentTimeMillis()-createdClock;
            long unitsPassed=unit.convert(millisPassed, TimeUnit.MILLISECONDS);
            long delayInGivenUnits=unit.convert(delay, timeUnit);
            return delayInGivenUnits-unitsPassed;
        }

        public int compareTo(Delayed o) {
            if (o instanceof DelayedMessage)
                return new Long(createdClock)
                        .compareTo(((DelayedMessage)o).createdClock);

            return new Long(getDelay(TimeUnit.NANOSECONDS))
                    .compareTo(o.getDelay(TimeUnit.NANOSECONDS));
        }

        public MessageHeaders getHeaders() {
            return wrappedMessage.getHeaders();
        }

        public Object getPayload() {
            return wrappedMessage.getPayload();
        }

    }

    public SimpleDelayQueueChannel(long delay, TimeUnit timeUnit) {
        /* QueueChannel expects a queue capable of holding any Message,
         * but DelayQueue requires its elements to implement Delayed interface.
         * So we MUST override doSend so we control what is inserted into
         * the queue.
         */
        super((BlockingQueue)new DelayQueue());
        this.delay=delay;
        this.timeUnit=timeUnit;
    }

    @Override
    protected boolean doSend(Message message, long timeout) {
        return super.doSend(new DelayedMessage(message), timeout);
    }
}
This class was created with a brevity on mind. It has a few shortcomings. The most significant is hard coded delay calculation, based on the system time when a message is inserted into the queue. I want to extract this logic into delay strategy class. This will allow the same queue to hold elements with different delays, for example.

And the following is the unit test for the simple delay queue channel.

public class DelayQueueChannelTests {
    static Logger logger = Logger.getLogger(DelayQueueChannelTests.class.getName());
    @Test
    public void testSimpleSendAndReceive() throws Exception {
        final AtomicBoolean messageReceived = new AtomicBoolean(false);
        final CountDownLatch latch = new CountDownLatch(1);
        final SimpleDelayQueueChannel channel = new SimpleDelayQueueChannel(100, TimeUnit.MILLISECONDS);
        new Thread(new Runnable() {

            public void run() {
                Message message = (Message)channel.receive();
                messageReceived.set(true);
                latch.countDown();
                assertTrue(message instanceof SimpleDelayQueueChannel.DelayedMessage);
                float waitTime=(System.currentTimeMillis()-message.getPayload())/1000.F;
                logger.fine("waited for "+waitTime+" seconds ");
            }
        }).start();
        assertFalse(messageReceived.get());
        channel.send(new GenericMessage(System.currentTimeMillis()));
        assertFalse(messageReceived.get());
        latch.await(25, TimeUnit.MILLISECONDS);
        assertFalse(messageReceived.get());
        latch.await(1, TimeUnit.SECONDS);
        assertTrue(messageReceived.get());
    }
}
//funny how blogspot lower-cases and closes  "tags" :-)
//don't copy them to java, and change long to Long in angle brackets in the code.
Do you have any comments, suggestions, questions? Don't hesitate to comment here, there or by e-mail.

Wednesday, February 4, 2009

AppEngine dev_appserver logging

For some weird reason I cannot debug on dev_appserver. My breakpoints are simply ignored. So I placed logging code in troublesome places. By default, dev_appserver sets the root logger level to INFO. If run with -d option, it's DEBUG, and it logs all environment for every request. I tried to set the root level to WARNING or higher, but it was either ignored or made logger totally silent. So the best option I found is to leave the root level to INFO and to use module loggers for application-specific DEBUG messages. In the __main__ function I added the following lines:
logger=logging.getLogger("my")
logger.setLevel(logging.DEBUG)
Every module has to get its own logger like this:
# module engine.py
import logging

logger=logging.getLogger("my.engine")
Because of the dot separator my.engine logger inherits the configuration of my logger, so DEBUG messages are printed on the console.

I also did not find the correct way to add handlers to my logger, because if I change the logger initialization like this:

logger=logging.getLogger("my")
logger.setLevel(logging.DEBUG)
ch=logging.StreamHandler()
logger.addHandler(ch)
It adds a new handler for every request, so each message is printed many times. Of course, it's possible to remove the handler after run_wsgi_app call, but it looked weird to add and immediately remove the handler every time. If you know a better way to configure logging with dev_appengine, please let me know.

Sunday, February 1, 2009

Scriptaculous and AJAX

I started with a task which seemed to be typical when script.aculo.us is used with Prototype Ajax.Request. The old content nicely disappears with one of scriptaculous effects, AJAX request is sent and when result is available it appears with another effect. Let's use Effect.SlideUp and Effect.SlideDown for these effects, and <div id='main_div'> for the content. Straight-forward solution looks like this:
new Effect.SlideUp('main_div', {
      afterFinish: function () {
        new Ajax.Request(url, {
            method:'get',
            onSuccess: function(transport){
              $('main_div').innerHTML=transport.responseText;
              new Effect.SlideDown('main_div');
            }
          })
      }
    });
Failure handling is omitted for brevity. This solution works, but has a significant problem: the request is sent only after the slide up effect is finished, so the user waits more than necessary. I wanted to send the AJAX request immediately, so the response might be ready when the slide up is finished. But it's impossible to know which will finish first.
My next try was to start slide up and immediately send the request, like this:
    new Effect.SlideUp('main_div');
    new Ajax.Request(url,
    {
        method:'get',
        onSuccess: function(transport){
             $('main_div').innerHTML=transport.responseText;
             new Effect.SlideDown('main_div', {queue: 'end'});
        }
    });
Unfortunately, it did not work correctly. If the response comes before the slide up vanished the main_div, it will be replaced with the new content for a moment, then disappear and come nicely with the slide down effect. So the problem here is that replacing the content and slide down must start only when both slide up and the AJAX are finished. I ended up with the following:
    var hideEffectComplete=false;
    var ajaxResult=null;
    new Effect.SlideUp('main_div', {
        afterFinish: function () {
            complete=true;
            if (ajaxResult != null) {
                $('main_div').innerHTML=ajaxResult;
                new Effect.SlideDown('main_div');
            }
        }
    });
    new Ajax.Request(url,
    {
        method:'get',
        onSuccess: function(transport){
          ajaxResult=transport.responseText;
          if (hideEffectComplete) {
             $('main_div').innerHTML=ajaxResult;
             new Effect.SlideDown('main_div');
          }
        }
    });
It works better, but it's long, ugly and redundant. Also it makes problems when a user makes a few actions fast, things are just messed up. Does anybody have a better idea how to synchronize AJAX and script.aculo.us?

Saturday, January 31, 2009

Inherited classes in Hibernate

Few days ago I made some refactoring of a Hibernate based JavaEE application. There was a table and a view on that table which included all columns, like this:
CREATE TABLE Person (
  Id NUMBER,
  Name VARCHAR(10),
  BirthDate DATE,
);

CREATE VIEW PersonExtended AS
  SELECT p.*, YearsFromNow(p.BirthDate) AS Age FROM Person p;
Assuming we have a corresponding function this view will include all columns from Person and have an additional column named Age. Before refactoring, there were 2 corresponding entity classes. In the actual code entities have full annotated getters and corresponding setters, but for readability I'll use the most compact and not recommended format here:
//Person.java

@Entity
class Person {
  @Id long id;
  String name;
  Date birthDate;
}

//PersonExtended.java

@Entity
class PersonExtended {
  @Id long id;
  String name;
  Date birthDate;
  int age;
}
Trying to remove the code duplication I changed the entities as following:
//Person.java

@Entity
@Inheritance (strategy=InheritanceType.TABLE_PER_CLASS)
class Person {
  @Id long id;
  String name;
  Date birthDate;
}

//PersonExtended.java

@Entity
class PersonExtended extends Person {
  int age;
}
Alone from the cosmetic improvement, this change also allowed to use the same code for working with both entities. But this polymorphism also created new problems. For example, query fetching all data from Person generated the following SQL:
SELECT p.*, NULL as Age, 1 as discriminator from Person p
  UNION
SELECT pe.*, 2 as discriminator from PersonExtended pe;
For clarity I replaced with * the actual field list from Hibernate generated SQL. So what happened? Hibernate treats PersonExtended as kind of Person, so the result of this query would be all records from Person followed by all records of PersonExtended! They will have correct type in Java, by the way, thanks to discriminator columns generated by Hibernate. Anyway, it's not what we wanted and it's a regression (a new bug) after the refactoring. To fix that bug we must tell Hibernate that PersonExtended is not considered Person. I used a MappedSuperclass for that:
//AbstractPersonBase.java

@MappedSuperclass
abstract class AbstractPersonBase {
  @Id long id;
  String name;
  Date birthDate;
}

//Person.java

@Entity
Person extends AbstractPersonBase {
  //empty, all person data is defined in the superclass
}

//PersonExtended.java

@Entity
PersonExtended extends AbstractPersonBase {
  int age;
}
This code correctly defines the relation between PersonExtended and Person. They have common part but should not be used one instead of the other. This solution with an abstract base has no problem with fetching different entities in the same query. On the other hand, it allows using AbstractPersonBase in cases where both entities are processed in the same way in Java.

Friday, January 9, 2009

Python class slots

Today I came over __slots__ feature of Python. It's used to define the list of possible attributes at the class creation time, so by default no dictionary is kept for every instance. This can save memory, if such instances are stored in big lists. To use slots, class should be defined like this:
class Point(object):
  __slots__=["x","y"]
The next example demonstrates the difference between a class with slots and a regular class.
class OldPoint(object):
  pass

p=OldPoint()
p.x=10
p.y=20   # these are OK
p.z=30   # this is OK as well - any attributes are allowed

p=Point()
p.x=10
p.y=20   # this are OK
p.z=30   # this causes AttributeError: 'Point' object has no attribute 'z'
Defining __slots__ affects not only the dictionary of the instances, but also the way they are serialized (or pickled in Python terminolodgy). Also a weak reference (__weakref__) is not enabled by default (can be overriden)

Links

Tuesday, January 6, 2009

lj-cut on blogger

LifeJournal has a useful feature lj-cut. It allows to show only a part of the post on the main page, and reveal the rest on a separate page. I was looking for a similar feature on blogger, as my posts with code examples are quite lengthy.
Don't need to say much more, the solution is here. Don't forget the step 1, I started from the red part and scratched the head what's wrong.

P.S. I ended up changing their tags from span to div, as span can not include <pre> elements among many other limitations.

Trivial resolution of Datastore performance

In addition to Model.put() Datastore has db.put(). I did not notice the latter can put several entities at once until Arachnid told me so. So in my code I changed this:
for cell in cells:
  cell.put()
To this:
db.put(cells)
That's all what was needed to fix the performance.

Sunday, January 4, 2009

Improved Datastore performance

Looks like the problem with Datastore performance is that the information was very fine-grained. I created the test following Google's suggestion (look at the tip at the end of the page). So this time I made an opposite test:
  • Instead of having a single integer, each entity has a text with 10,000 characters
  • A half of records is written in transactions by 10 records, and another half - record by record
The results show that the size of entity had no effect unlike entities' count. So it's better to write a few large objects than many small ones.
Also, this time I had a huge difference between the real appengine server and dev_appserver after having many records in the database (real server was much faster). Grouping few records in a transaction also helped. This is the test code:
from google.appengine.ext import db
from time import time

print 'Content-Type: text/plain'
print ''

total_t=time()
class Root(db.Model):
    pass

class C(db.Model):
 i=db.TextProperty()

t1000="a"*10000

def add_in_transaction(root, text, amount):
     for j in range(amount):
        c=C(parent=root, i=text)
        c.put()

print "with transactions - big"
for i in range(5):
    t=time()
    root=Root()
    root.put()
    db.run_in_transaction(add_in_transaction, root, t1000, 10)
    print time()-t
print "without transactions - big"
for i in range(5):
    t=time()
    root=Root()
    root.put()
    add_in_transaction(None, t1000, 10)
    print time()-t
print "without transactions - small"
for i in range(5):
    t=time()
    root=Root()
    root.put()
    add_in_transaction(None, "a", 10)
    print time()-t

print "total time:", time()-total_t
And this is the result
with transactions - big
0.161096096039
0.154489994049
0.367100000381
0.152635812759
0.153033971786
without transactions - big
0.315757989883
0.359083890915
0.559228181839
0.360776901245
0.330877780914
without transactions - small
0.279601812363
0.541454076767
0.324053049088
0.311630964279
0.306309938431
total time: 4.67810916901
I think it's worth to open a bug on appengine documentation so they mention these performance considerations.

P.S. changed the test a little to demonstrate that writing one character or 10K characters has no difference.

Datastore performance

Something strange with the performance of the AppEngine Datastore. I tried to run the following code:

from google.appengine.ext import db
from time import time

print 'Content-Type: text/plain'
print ''

total_t=time()

class C(db.Model):
 i=db.IntegerProperty()

for i in range(10):
 t=time()
 for j in range(10):
  c=C(i=i)
  c.save()
 print time()-t

print "total time:", time()-total_t
As you can see, this is a complete python module, not dependent on django or anything else. Just add a corresponding mapping to app.yaml and you can try it by yourself. So the output of this code, which adds 100 records to the Datastore is:
0.307200908661
0.279258012772
0.305376052856
0.310864925385
0.286242008209
0.283288002014
0.299383878708
0.286517858505
0.281584024429
0.268044948578
total time: 2.90873217583

I tried to add 200 records, and got a time-out as AppEngine does not allow long-running queries. I had pretty similar timings on the dev_appserver. This is very slow, and I cannot understand where is the catch.

Saturday, January 3, 2009

Querying for None in Datastore

I got a weird problem with GAE Datastore, when tried to search for None value. If I use gql, then the query works as expected:

from game.models import *
for c in Cell.gql("WHERE game=:g", g=None):
 print c

The above code prints the expected cells which are not bound to any game. But I need to iterate through cells of a certain board type, so instead of Cell.gql I start from board.cell_set and am trying to define a filter on game=None. The following code should give the same outcome as the previous one:

from game.models import *
for c in Cell.all().filter("game=", None):
 print c

But this time I get no results. Why?

Cached ReferenceProperty: now with round trip

One thing was really missing in a CachedReferenceProperty - cached round trip. Suppose we have the following one-to-many relationship:

class Master(db.Model):
  pass

class Detail(db.Model):
  master=CachedReferenceProperty(Master)

By cached round trip here I mean that when a master holds a cached collection of details, those details reference the same master, so going back and forth from master to details does not make any database hits.

To make it possible, I replaced collection builder in _CachedReverseReferenceProperty from this:

  res=[c for c in query]

to this:

  res=[]
  for c in query:
    resolved_name='_RESOLVED_'+self.__prop #WARNING: using internal
    setattr(c, resolved_name, model_instance)
    res += [c]

Very ugly, need an idea how to eliminate using internal attribute. The whole source file is here.