Showing posts with label netbeans. Show all posts

Sunday, September 18, 2011

Node.js plugin for NetBeans and daemons

Today I tried NodeJS plugin for NetBeans by Syntea software group. It allows to run a node straight from the NetBeans. I took an HTTP variant of "Hello, world" sample, which listens to port 8000, and responses with greetings to every request after a short delay. NetBeans stopped responding. So I downloaded the sources of this plugin to see how to fix it.

First of all, this is the source of my "Hello, world":
var sys = require('sys'),
    http = require('http');

    http.createServer(function (req, res) {
        setTimeout(function () {
            sys.puts('requested '+req.url)
            res.writeHead(200, {'Content-Type': 'text/plain'});
            res.end('Hello World\n');
        }, 100);
    }).listen(8000);

sys.puts('Server running at http://127.0.0.1:8000/');
So to narrow the problem, I commented out the http.createServer block, so this program only lies about listening, and exits immediately. This time, NetBeans did not stuck, ran the code as expected, and printed the "Server running..." in the output window. Same happens if I do start listening, make a few requests, and then kill the node with killall node. But the output 'requested /' and 'requested /favicon.ico' which were supposed to be printed during requests, were all printed after I killed the Node.js server.

So I started to suspect they run the server synchronously, and was right. Here is a snippet from the sources of the plugin, method cz.kec.nb.nodejs.RunNode.performAction:

            Process proc = Runtime.getRuntime().exec(cmd);
            proc.waitFor();                                           //    <------ NetBeans gets stuck here   !!!
            BufferedReader read = new BufferedReader(new InputStreamReader(proc.getInputStream()));
            BufferedReader readerr = new BufferedReader(new InputStreamReader(proc.getErrorStream()));
            while (read.ready()) {
                out.println(read.readLine());
            }
            while (readerr.ready()) {

                printErrLine(readerr.readLine(), io);
                //erout.println(readerr.readLine());
            }
Unfortunately, Java designers did not provide a way to check the process status without blocking, you can only wait until process ends. So we have to waste a thread on this proc.waitFor. Really annoying and wasteful.

BTW, I looked at the implementation class, package private java.lang.UNIXProcess, and it has private hasExited field. Many thanks to whoever decided to make this unaccessible for the rest of us, all the wasted threads will torture you for eternity, when the time comes! Mwahaha!

Anyway, in addition to this thread, necessary because of a lame API of java.lang.Process, another thread is necessary for reading and printing whatever Node.js application wants to print. I'm pretty sure, that's not a correct way for a NetBeans plugin to deal with long-running tasks, and will be glad if someone shows me a correct way. But it worked for me :-). So, after my changes the code looked like this:

            final Process proc = Runtime.getRuntime().exec(cmd);
            final BufferedReader read = new BufferedReader(new InputStreamReader(proc.getInputStream()));
            final BufferedReader readerr = new BufferedReader(new InputStreamReader(proc.getErrorStream()));
            final AtomicBoolean done = new AtomicBoolean(false);
            new Thread(new Runnable() {
                public void run() {
                    try {
                        while (!done.get()) {
                            while (read.ready()) {
                                out.println(read.readLine());
                            }
                            while (readerr.ready()) {
                                printErrLine(readerr.readLine(), io);
                                //erout.println(readerr.readLine());
                            }
                            Thread.sleep(500);
                        }
                        
                        read.close();
                        readerr.close();
                    
                    } catch (Exception ex) {
                        Exceptions.printStackTrace(ex);
                    }
                }
            }).start();
            new Thread(new Runnable() {
                public void run() {
                    try {
                        proc.waitFor();
                    } catch (InterruptedException ex) {
                        Exceptions.printStackTrace(ex);
                    }
                    finally {
                        done.set(true);
                    }
                }
            }).start();
Cross-posted to Tikal community site
Thursday, May 7, 2009

Debugging AppEngine application on NetBeans

Earlier I explained how to open and compile a Java AppEngine application on NetBeans. Now let's see what it takes to debug it.
If you are familiar with remote debug mode of NetBeans, it's actually very easy to connect to a running AppEngine dev_appserver. But first we should open a port to connect to. This is how it's done on Windows.
Edit AppEngine Java SDK dev_appserver script. It's located in appengine-java-sdk-1.2.0/bin folder. There are two versions of this script: for Windows (dev_appserver.cmd) and for Unix/Linux/OSX (dev_appserver.sh). There is also appcfg script, which we will not change. Open the script corresponding to your operating system (File|Open File... in NetBeans). The Windows command script looks like this:
@java -cp "%~dp0\..\lib\appengine-tools-api.jar" ^
    com.google.appengine.tools.KickStart ^
       com.google.appengine.tools.development.DevAppServerMain %*
You need to edit this file to look like this:
@java -cp "%~dp0\..\lib\appengine-tools-api.jar" ^
    com.google.appengine.tools.KickStart ^
       --jvm_flag=-Xdebug ^
       --jvm_flag=-Xrunjdwp:transport=dt_socket,address=8000,server=y,suspend=n ^
       com.google.appengine.tools.development.DevAppServerMain %*
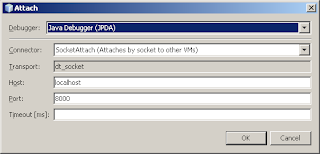
This will open port 8000 so a remote debugger can attach. Now open a command prompt and change current directory to appengine-java-sdk-1.2.0. Then run dev_appserver with your application, for example by typing bin\dev_appserver.cmd demos\guestbook\war. This will run the dev_appserver as usual, but this time the debug port is open. It should print on the very first line something like: Listening for transport dt_socket at address: 8000. Now attach to this port from NetBeans. In Debug menu select Attach Debugger.... This will open the following dialog box:

Fill the values like on the screen shot, and press OK. If the debugger attaches correctly, the stop and pause buttons in the toolbar and the corresponding menu items in Debug menu should become enabled.
Let's set a break point now. Press Ctrl-O and type "Greeting" to open a persistent class and set break point in getAuthor method. Now go to http://localhost:8080/guestbook.jsp in your browser and NetBeans should stop on this break point for every record in the guest book. Enjoy!

Friday, April 17, 2009

AppEngine project on NetBeans

This is a beginning of discussion, continued here

Recently Google released an early look of AppEngine for Java. It includes an Eclipse plugin for developing with AppEngine Java SDK. I wanted to check is it possible to develop AppEngine Java application using NetBeans

Environment

  1. Sun JDK 1.6.0_12
  2. NetBeans 6.7 M2 (pre-release)
  3. gae-java-sdk-1.2.0

Opening project

Let's start with basic AppEngine demo Guestbook. It's located in demos/guestbook directory of gae-sdk-java.

Create project wizard

Start the wizard with File|New Project.

Step 1

Select options like this:

Step 2

Enter the location of the project in the edit box, or click browse:

The rest of the lines will be filled automatically.

Step 3

Leave the default options on the "Build and Run Actions" page.

Step 4

Don't change anything on the "Web Sources" page.

Step 5

Click "Next" on "Source Package Folders" page.

Step 6

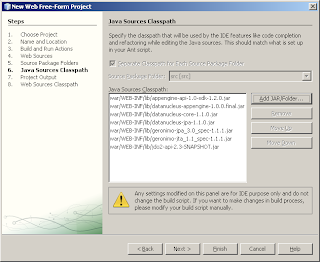
Click "Add JAR/Folder" on the "Java Sources Classpath" page and add all jars located in war/WEB-INF/lib folder under guestbook root:

Click Finish to leave default settings on the last two pages.

Fixing classpath

The resulting project will look like this:

Two Servlet files have errors because NetBeans has limited abilities on parsing ant build files. It could not extract the compile time dependencies from build.xml, so we pointed to WEB-INF/lib libraries at Step 6. But one of the compile dependencies (Servlet API jar) is located outside of the project tree. It's because this jar is supplied by the application server. In my pre-release version of NetBeans the UI is not able to use dependencies outside of the project tree, but it's easy to work around.

Edit project.xml

Press Ctrl-F2 or select Window|Files to switch to files panel. You see all files under your project root:

Click on + sign to open nbproject, right-click on project.xml and select Edit. This opens internal NetBeans project file which contains all the settings we selected in the wizard. Find line which contains <classpath> element near the end of the file. Go to the end of the line and add the path Servlet API jar. This jar is located in lib/shared folder under the Google AppEngine Java SDK folder, in my case the full path was C:\work\appengine-java-sdk-1.2.0\lib\shared\geronimo-servlet_2.5_spec-1.2.jar

Press Ctrl-S to save the project.xml file and return to Projects pane (press Ctrl-1). Now NetBeans is happy and no errors are reported.

Running the application

You can run this application as you run any project in NetBeans. If this is the main project, simply press F6. When the project is running, you will see the following line in the Output window: The server is running at http://localhost:8080/. You can enter this URL in a browser and start using the Guestbook application. In this post you can find out how to debug AppEngine java web application using NetBeans.